I had been wanting to shoot with this model (who is also my friend), for a while now, and on Easter weekend we finally got around to it. The focus for me this year is gel photography, so I knew we'd be using gels, just I wasn't entirely sure the route we'd go. I had been eyeing the Wescott Lyndsay Adler optical snoot for a little while too, but here in the UK, it's near impossible to find! After a little digging, I found a Chinese brand called jinbei that sell a similar product, that's affordable, and ships to the UK! Result! However, I wasn't sure if it'd arrive in time..
The inspiration I gave Katey (the model), for the shoot was some simple and elegant looks. A little bit of colour, a little bit of drama, but a whole load of beautiful portraits. I'd sent over around 12 shots but aimed to complete 3 looks in our 2 hour slot. Quickly, we smashed out 3 different looks and had around an hour to play!
What was I going to do for the hour?!
As it turns out, the quoted delivery date on the snoot was wrong! I was quoted a 3 week delivery time, whereas, in reality, it took 4 days. Which had it turning up the day before shooting with Katey! Can you guess where this is going..?
I had unboxed the snoot and had the briefest of plays with it before packing it away, just in case.. The extent of which was seeing if it'll fit my AD300 pro strobe. So not much in the way of learning.
Back to the spare hour. I pulled out the snoot with the intention of shooting a nice hard light circle on Katey and it looked terrible! Not because of Katey, but because I was winging it. I had Katey in our previous setups position - 6ish feet away from the black wall, and wondered why the spot wasn't reaching the wall, let alone looking circular.. Focusing the light didn't work either.
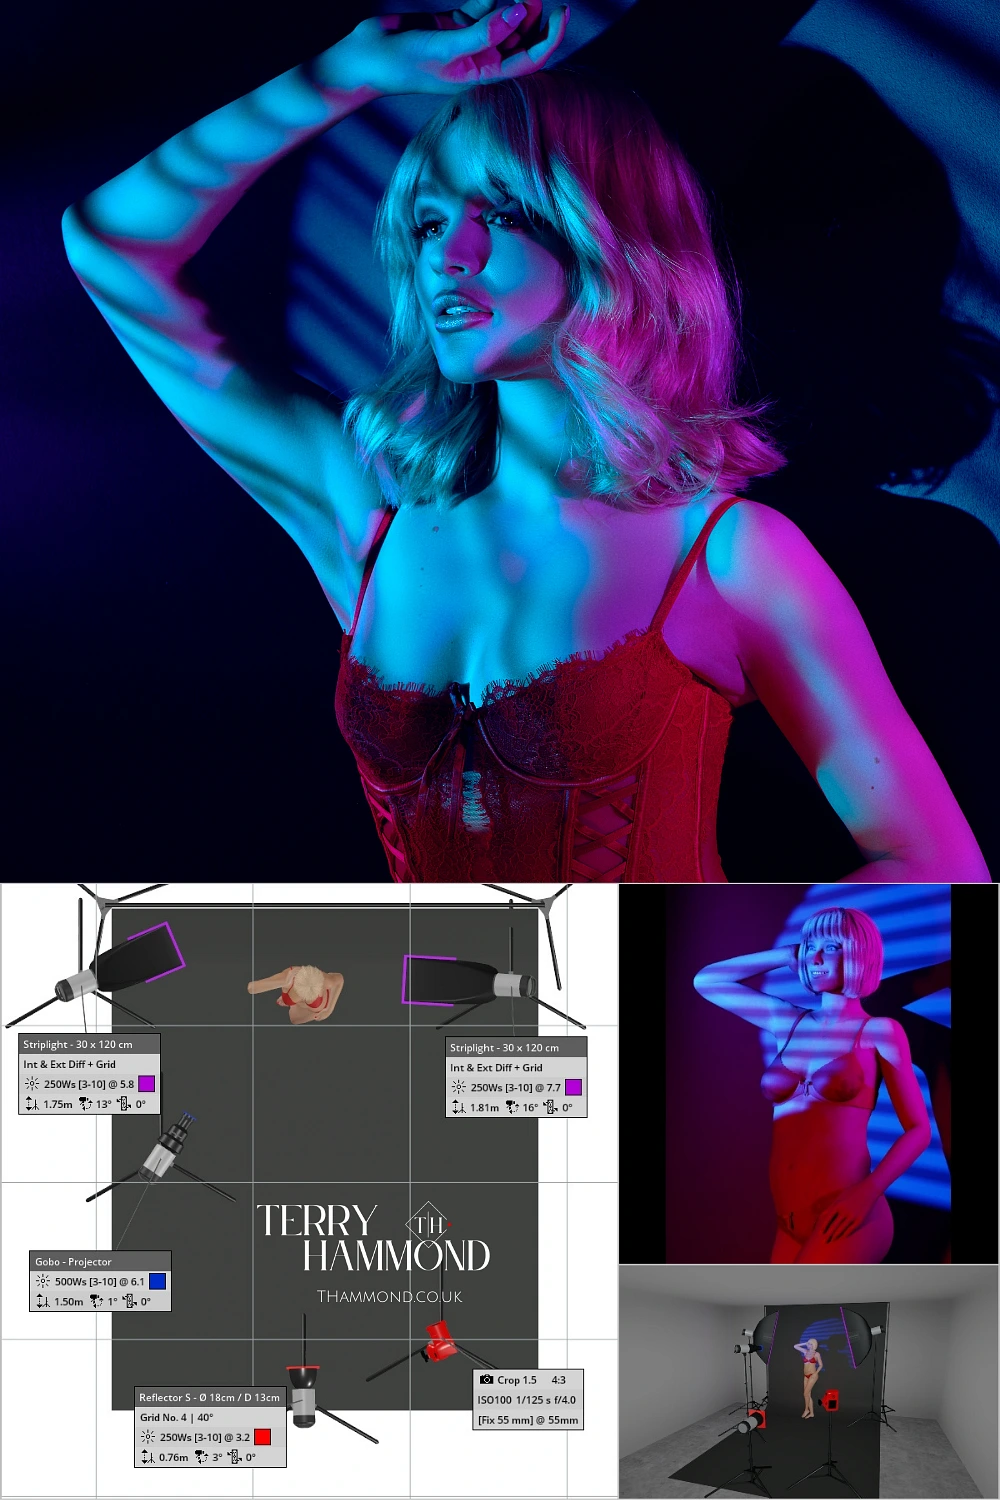
My stupid ass realised after that I needed Katey super close to the wall. Basic stuff, but learning on the go had me not thinking correctly! Pushing Katey back, I had to move the strip box rim lights and the bottom light too. Camera left strip box I intentionally leaned slightly toward the wall to pick up a little more texture.
With the lights in place, a gobo was added to the snoot and slightly defocused so the lines wasn't overly sharp. I switched my angle to the side, and what you see is the final product.
Below is a brief overview of the light setup we used. The gels were Lee filter gels, which I'm totally in love with! A slight tweak and colour grade in photoshop and we have a final product!
I get dramatic, moody and colourful Hollywood vibes from this. A couple of Hollywood inspired shots were part of our inspiration, just in case the snoot came, and I think we've pulled it off quite well! It's making me want to use the snoot for so much more!
The set up:


 ) to see how your blog looks